Photo by Growtika on Unsplash
The Internet of Things (IoT) has rapidly grown in recent years, and it has become a crucial component in several applications, ranging from smart homes to industrial control systems. A multi-agent IoT system, on the other hand, consists of multiple interconnected IoT devices.
In today’s interconnected world, it is essential to have a way to easily intercommunicate IoT devices with cloud platforms such as Google Cloud Platform (GCP) and Amazon Web Services (AWS). This can enable powerful applications and services that leverage data from a variety of sensors and devices. In this article, we will cover some of the basic steps for integrating IoT devices with GCP using cloud functions, Pub/Sub, and Firestore.
Please note that this article is a shortened version of what was covered in my master thesis "A cloud architecture to integrate a multi-agent smart parking system". For more specific details and advanced usage, please consult the GCP documentation.
Use case
In my master thesis, the use case was a smart parking with multiple car spots that would communicate with each other to decide where the user should park. That is too complicated for personal use, so another potential use case for a multi-agent IoT system integrated with GCP is a DIY smart home. In this scenario, multiple devices such as smart thermostats, lighting systems, and security cameras could communicate with each other to create a more efficient and secure living space.
For example, a smart thermostat could adjust the temperature based on the occupancy detected by a motion sensor, and a security camera could send an alert to the homeowner’s smartphone if it detects motion while the homeowner is away. All of these could be represented by multiple Raspberry Pi devices running javascript.
The data collected from these devices could be stored and processed using GCP’s powerful cloud services, enabling advanced analytics and machine learning applications to optimize the home’s energy usage and security.
Step 1: Setting up the Google Cloud Platform
Create a new project in the Google Cloud Platform console
To create a new project, go to the Google Cloud Console and click on the project drop-down menu. From there, select “New Project” and follow the prompts to set up your project. Give your project a descriptive name and make sure to enable billing to use the Google Cloud Platform’s services.
Enable the necessary APIs for your project
Once you have created your project, you need to enable the following APIs:
- Cloud Pub/Sub API: This API enables you to create and manage Pub/Sub topics and subscriptions.
- Cloud Functions API: This API enables you to create and manage Cloud Functions.
- Cloud Firestore API: This API enables you to create and manage Cloud Firestore databases.
To enable the APIs, go to the Google Cloud Console and click on the hamburger menu in the upper-left corner. From there, select “APIs & Services” and then “Dashboard.” Next, click on “Enable APIs and Services” and search for the APIs mentioned above. Enable each of these APIs for your project.
Set up authentication and authorization for your project
You need to create a service account key to set up authentication and authorization for your project. This key is used to authenticate and authorize requests to the Google Cloud Platform’s services.
To create a service account key, go to the Google Cloud Console and click on the hamburger menu in the upper-left corner. From there, select “IAM & Admin” and then “Service accounts.” Next, click on “Create Service Account” and follow the prompts to create a new service account. Once you have created your service account, click on the three-dot menu on the right-hand side of your service account’s row and select “Create Key.” Choose JSON as the key type and download the key file.
You must store the service account key securely and make it available to your code when it runs on the Google Cloud Platform. One way to do this is to add the key to your code’s environment variables.
Step 2: Setting up the IoT Devices and Pub/Sub
Set up a Pub/Sub topic and subscription
To receive data from your IoT devices, you need to set up a Pub/Sub topic and subscription. The topic is where the IoT devices publish their data, and the subscription is where your Cloud Functions receive the data. You can have multiple topics and subscriptions, each for its corresponding subject, such as when the temperature changes or motion is detected.
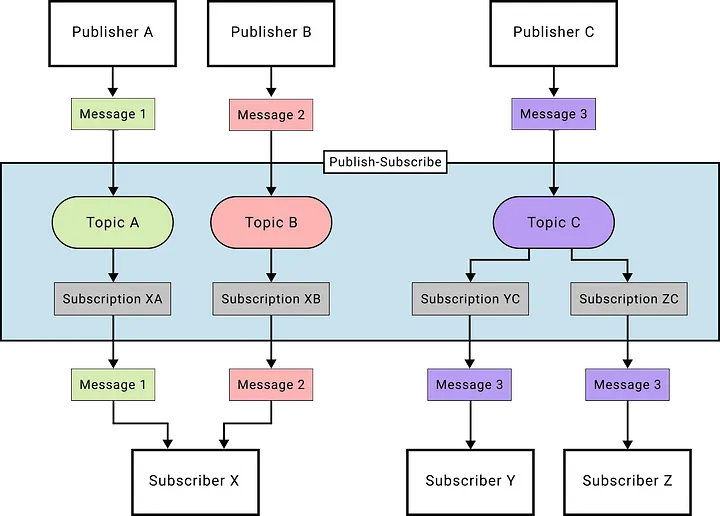 Data flow using PubSub’s topics and subscriptions
To set up a Pub/Sub topic and subscription, go to the Google Cloud Console and click on the hamburger menu in the upper-left corner. From there, select “Pub/Sub” and then “Topics.” Next, click on “Create Topic” and give your topic a descriptive name. Once you have created your topic, click on its name to view its details.
Next, click on “Create Subscription” and follow the prompts to create a new subscription. Make sure to choose your Cloud Function as the endpoint for your subscription if you are planning to use it to store the received data.
Set up your IoT devices to publish data to Pub/Sub
To publish data to Cloud Pub/Sub, your IoT devices must be able to authenticate and authorize with the Google Cloud Platform’s services. You can achieve this by using a library like the Google Cloud Client Libraries or by manually creating and signing authentication tokens.
Here’s an example of how to use the Google Cloud Client Libraries to publish a message to a Pub/Sub topic in JavaScript:
const { PubSub } = require("@google-cloud/pubsub");

const pubsub = new PubSub();

export default async function publishMessage(topicName, data) {
  const dataBuffer = Buffer.from(JSON.stringify(data));
  const topic = pubsub.topic(topicName);

  try {
    const messageId = await topic.publishMessage({ data: dataBuffer });
    console.log(`Message ${messageId} published.`);
  } catch (error) {
    console.error(`Received error while publishing: ${error.message}`);
    process.exitCode = 1;
  }
}
In this example, the function publishMessage takes a topicName and a data object containing a message. The function publishes the message to the Pub/Sub topic provided by the topicName parameter and returns a success or an error message.
Set up your IoT devices to receive data from Pub/Sub
To communicate with each other, your devices must be able to receive messages too, and that’s when you need to set up a subscription method.
const { PubSub } = require("@google-cloud/pubsub");

const pubsub = new PubSub();

export default function listenForMessages(subscriptionName) {
  const subscription = pubsub.subscription(subscriptionName);

  const messageHandler = (message) => {
    const data = message.data.toString();
    console.log(`Message received: ${data}`);
    message.ack();
  };

  subscription.on("message", messageHandler);

  return () => {
    subscription.removeListener("message", messageHandler);
    console.log("Stopped listening messages");
  };
}
Once the function is called, the code creates a new subscription object to listen to a subscription provided by the subscriptionName parameter. The code listens for incoming messages on the subscription using the on method and logs each message to the console. Finally, the code acknowledges each message using the ack method to let Pub/Sub know that the message has been processed.
After the device is done listening to the messages, you can simply use the function’s return to remove the message handler from the subscription.
// This will activate a message listener
const stopListening = listenForMessages(subscriptionName);
// After a while, you can stop listening for messages
stopListening();
Step 3: Process the data received from your IoT devices
You might need to use the information that is being sent from your devices for analytics or tracking. To process the data from your IoT devices, you need to write a Cloud Function that is triggered when data is received from your Pub/Sub subscription.
 Usage of Cloud Functions to add logs in the database
Here’s an example of how to write a Cloud Function in JavaScript that processes data received from a Pub/Sub subscription and adds to a collection in Cloud Firestore (Database):
const functions = require('firebase-functions');
const admin = require('firebase-admin');
const app = admin.initializeApp();
const firestore = app.firestore();

const topicName = 'topic-name';
const devicesCollection = 'devices';
const logsCollection = 'logs'

exports.processData = functions.pubsub.topic(topicName).onPublish((message) => {
  const deviceId = message.attributes.deviceId;
  const data = JSON.parse(Buffer.from(message.data, 'base64').toString());
  console.log(`Data received: ${JSON.stringify(data)}`);

  const logsRef = firestore.collection(devicesCollection).doc(deviceId).collection(logsCollection);
  await logsRef.add(data);
  console.log(`Data added to ${devicesCollection}: ${JSON.stringify(data)}`);
};
In this example, the Cloud Function creates a reference to a new document in the devices/deviceId/logs collection in Cloud Firestore with the data received from the Pub/Sub subscription, and logs a message to the console indicating that the data was added to the collection.
Note that you will need to set up your Cloud Firestore database and authenticate and authorize your Cloud Function to access it using a service account key. You can do this in the Google Cloud Console by navigating to “Firestore” under “APIs & Services” and following the prompts to create a new database and set up authentication and authorization.
Conclusion
If you’re considering integrating an IoT system with cloud technologies for personal use, there are plenty of benefits to be gained. By connecting your devices to the cloud, you can access real-time data and insights that can help you optimize your daily routine.
Additionally, cloud-based IoT solutions offer greater flexibility, scalability, and affordability compared to traditional systems, making them accessible to more people than ever before. Whether you’re looking to simplify your daily tasks or unlock new possibilities for innovation, integrating IoT with cloud technologies can help you achieve your goals.